
Your Tuesday interview is two days away. You're working through your interview prep checklist: research the company, practice your answers, pull up your resume and map stories to bullet points.
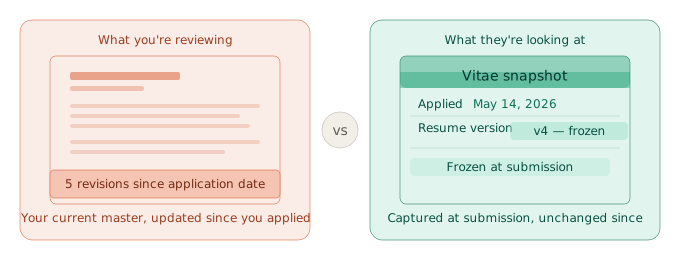
But the resume you're looking at is not the one they received.
You applied three weeks ago. Since then, you've updated your summary, reordered a section, and swapped out two bullet points for this week's applications. The version they have, the one they printed or pulled up when your name came through, is from three weeks ago. You're preparing for an interview based on a document that no longer matches what they have in front of them.
This is the step missing from most interview prep advice. Research the company, practice common questions, have questions ready, confirm logistics: all correct. But every checklist assumes you know exactly what's on the resume they received. If you've been actively tailoring your resume and editing between submissions, that's not a safe assumption.
This interview preparation checklist starts where it should, with the submission, then works through everything else.
Before You Start Preparing: Find the Resume They're Actually Looking At
Before you map a single story to a bullet point, find the version of your resume you submitted to this specific company.
Reviewing your resume before the interview sounds obvious. The part most people skip: they're reviewing the current version, not the submitted one.
This matters most for anyone who tailors per application. If you've applied to 20 or 30 roles over a couple of months, your resume has likely changed. Bullet points get reordered, skills sections get adjusted, summaries get rewritten to fit the role. The document you submitted to this company may differ meaningfully from what you're working from now.
If you have a frozen record: Pull it up and read it as the interviewer will, not as the author. What does it say about you? What questions does it invite? What did you emphasize for this specific role?
If you don't have a frozen record: Check your sent email for confirmation attachments, your downloads folder for dated PDFs, or file version history if your cloud storage tracks it. A Google Doc link is not a reliable record. It shows your current edits, not what you submitted.
This is the exact problem Vitae's snapshot feature addresses. When you log an application in Vitae, it automatically freezes the version of your resume at that moment. Edit your resume afterward and the snapshot stays unchanged. Three weeks later, when the interview request comes in, you can pull up exactly what they received.
See how the resume version tracking works if you want to understand how that fits into an application workflow.
The Bureau of Labor Statistics consistently finds job searches averaging five to six months for unemployed workers. Over that span, a resume goes through a lot of iterations. The gap between the version you submitted to a specific role and your current master can be significant by the time an interview is scheduled.
Find the right version first. Everything else in this checklist depends on it.
Step 2: Align Your Stories to What You Actually Claimed
Once you have the correct version in front of you, read every bullet point as a potential interview question.
Every claim is fair game. “Led cross-functional team of eight” means you need a story. “Reduced onboarding time by 30%” means you need the project, your specific role, and what changed. “Proficient in Salesforce” means you need to know exactly how proficient and in which parts of the platform.
Go line by line. For each bullet that could invite a “tell me more,” sketch the story. The STAR method is useful here (Situation, Task, Action, Result), but keep the stories honest, specific, and tied to what you actually did.
Behavioral questions, the kind that start with “tell me about a time when,” are almost always anchored in resume claims. Your bullet points are the source material.
Nadia spent most of a Sunday before a product manager interview rehearsing a detailed story about a data analytics initiative she had led. She had specifics about the tooling, the team size, and the measurable outcome. The interview came and the hiring manager never asked about it. Afterward, Nadia pulled up the version of her resume she had actually submitted and realized she had cut the analytics bullet entirely, replacing it with a customer success angle that was a better fit for the job description. She had spent hours preparing for a conversation that was never going to happen, and arrived underprepared for the one that did.
Your current resume is not the authoritative document for this interview. The submitted version is. Reading the wrong one is not a small oversight. It misaligns your preparation with the actual conversation.
Step 3: Research the Company and Role Before Your Interview
This section is in every interview prep checklist for good reason. Most guidance on how to prepare for a job interview starts here. Do it in a specific order.
Start with the job description. Which requirements map directly to what you submitted? Those are the areas most likely to generate detailed questions. Which were a stretch? Prepare to be honest about them and bridge to what you do bring. The job description also often signals what “success in this role” looks like, which becomes material for your own questions.
Then go to company research: recent news, product or service changes, leadership updates. A quick LinkedIn review of your interviewers tells you their background and tenure. Glassdoor and Blind are imperfect but useful for understanding culture patterns and recurring interview themes.
The goal is a real conversation, not a performance. Interviewers consistently distinguish between candidates who've done genuine research and candidates who've memorized the About page. The difference shows up in how you connect your experience to their actual context, not just theirs in the abstract.
Step 4: Prepare for the Specific Questions Your Resume Invites
Most interview prep focuses on generic questions: tell me about yourself, greatest weakness, where do you see yourself in five years. Know those. But the questions that determine whether you advance are usually driven by what you claimed.
Go back to the submitted version. Mark the bullets that are most distinctive: high-impact numbers, specific skills listed, claims that are central to this particular role. Those are your real preparation priorities.
Ten days before a phone screen for a sales operations role, Jordan had put “Salesforce administration” on a tailored version of his resume because the job description emphasized it. He prepared solid stories about pipeline management and process work. In the phone screen, the recruiter asked a specific question about building custom report types in Salesforce. Jordan was a power user, not an admin.
He stumbled. The recruiter moved on quickly. The mismatch was not dishonest. Jordan had used Salesforce extensively. But “administration” implied technical depth he had not prepared to demonstrate. Reading his submitted resume more carefully before the call would have flagged the gap before it became a problem.
Read your resume as a skeptical interviewer would. Where are the claims that need proof? Where are the numbers that invite follow-up? Prepare for those specifically. The generic questions you can handle. These are the ones that move the decision.
Step 5: Write Your Questions for Them
Five questions minimum. Not softballs. Not questions answered in the job description.
The best questions come directly from Steps 3 and 4, from your company research and from gaps you noticed between the role requirements and your own background. Questions that show genuine engagement are rare enough to be memorable.
Useful question types:
- Current challenges: “What's the biggest obstacle this team is working through right now?”
- Success definition: “What would a strong first six months look like in this role?”
- Team dynamics: “How does this team work with [other function]? Where do handoffs tend to get complicated?”
- Retention: “What keeps people here long-term?”
What to avoid in early rounds: compensation and benefits before they raise it, questions already answered in the job description, anything that puts the interviewer in an uncomfortable position about their own failures.
Having genuine questions signals that you're evaluating the fit as much as they are. That posture is different from someone trying to get through the process, and it reads differently.
Step 6: Confirm Logistics Before the Day Of
This section looks obvious and generates more last-minute problems than any other.
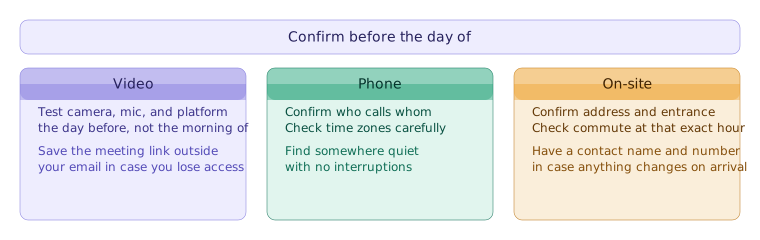
For video interviews: test your setup the day before, not the morning of. Camera, microphone, lighting, background. Confirm the platform and that you have working access to the link before you need it.
For phone screens: confirm who is calling whom, and double-check time zones if the company is in a different one. Be somewhere quiet.
For on-site: confirm the address and which entrance to use. Check the commute time at that specific hour with traffic, not the default. Have a contact name and phone number in case anything changes on arrival.
For any format: have water nearby, have the submitted resume version accessible, and know how to pronounce your interviewers' names if you have any doubt. Small logistical problems don't stay small when you're already nervous.
Step 7: Stop Preparing Before the Interview
Stop active preparation 24 hours before the interview.
Not because preparation doesn't matter. It clearly does. But marginal preparation at hour 20 has steeply diminishing returns compared to rest.
By the night before, you know the role, you know what you submitted, you've done the company research, you have your stories. The job now is to let it settle.
The night-before check is brief: confirm the calendar invite has the right details, scan the submitted resume once more, and stop. Sleep matters more than one more rehearsal run.
What to do before a job interview the night before is simpler than it sounds: confirm logistics, review what you submitted, and rest. If you've been organizing your search so preparation isn't a scramble, you already have everything you need.
A rested candidate hears follow-up questions correctly, handles silence without filling it badly, and has mental space for the unexpected. A tired candidate does none of those things reliably.
Going in, remember: getting a callback is itself a signal. According to the industry benchmark, roughly 8% of applications result in recruiter contact. You cleared that. The interview is a conversation to find out if there's a real match, not a test to prove you deserved the callback.
Step 8: After the Interview
Send a thank-you note the same day, before end of business.
One paragraph is enough: what you appreciated about the conversation, one specific thing that stood out, confirmation of your interest. This is not a second cover letter. Do not restate your qualifications.
More important than the note: log what happened. Which questions came up that you weren't prepared for? Where did you stumble? What would you answer differently?
This information is worth capturing while it's fresh. If there's a second round, these gaps are your preparation list. If you don't get the callback, patterns across multiple interviews are signal worth having.
Priya had a first-round phone screen for a director-level operations role that went well but not great. Two questions caught her off guard: one about OKR frameworks, one about managing through a reorganization. She wrote both down that evening and spent two evenings preparing honest, specific answers. Eight days later, she got the second-round invite for a panel with the VP of Operations.
Both questions came up again. This time she had real answers. She got the offer.
Tracking your applications carefully creates the record that makes this kind of feedback loop work. The interview log is one more piece of that: what you applied, what version you sent, what happened in the interview, what to carry forward.
The Complete Interview Prep Checklist
For quick reference:
- Find and review the exact version of your resume you submitted
- Map your prepared stories to what you actually claimed
- Research the company, the role, and your interviewers
- Prepare for the specific questions your resume invites
- Write five genuine questions for them
- Confirm logistics and test your setup the day before
- Stop active preparation 24 hours out and get rest
- Send a thank-you note same-day and log what you weren't prepared for
Putting It Together
This checklist works because Step 1 makes everything else accurate. Reviewing the wrong resume doesn't just waste time. It misaligns your stories, your examples, and your confidence with a document you can't see and they can.
For job seekers managing a structured search, how to organize your job search like a project manager covers the system for running it without things falling through. The version tracking piece connects the two: your application records need to include the submitted version, not just a note about which resume you used.
For the version control side specifically, how to always know which resume you sent covers why most tracking systems fail and what a reliable one actually looks like.
Vitae keeps your applications and resume snapshots in one place, so when the interview request comes in, you can pull up exactly what they're looking at without reconstructing from memory.
Create a free accountFree to start. No credit card required.